
Liquid measuring cups look simple, but their printed or painted markings can be surprisingly delicate. Repeated exposure to hot water, harsh detergent, abrasive powders, and rough scrubbers may fade measurement lines, loosen lettering, or leave a cloudy film that makes the numbers difficult to read. A cup that still holds 1 cup of liquid is not very useful if you can no longer tell where the 1-cup line is.
The safest approach is to rinse residue promptly, use mild dish soap, and clean with a soft sponge or cloth. Avoid treating every cup the same: glass, silicone, and plastic can tolerate different temperatures and cleaning methods. The steps below explain how to wash liquid measuring cups without ruining markings while keeping spouts, corners, and flexible surfaces clean.
As an Amazon Associate we earn from qualifying purchases at no extra cost to you. Product prices and availability are accurate as of the date shown and are subject to change.
Quick answer: Our top pick in 2026 is the Lukewarm water, about 90–110°F — our #1 rated choice. See the full ranked comparison, alternatives and buying advice below.
What You Need
| Item | Why | Optional? |
|---|---|---|
| Lukewarm water, about 90–110°F | Loosens syrup, oil, batter, and other residue without an unnecessary heat shock to glass | No |
| Mild liquid dish soap | Breaks down grease without the abrasive ingredients found in some powders | No |
| Soft cellulose sponge or microfiber cloth | Cleans the surface while minimizing friction on printed markings | No |
| Soft bottle brush, 1–2 inches wide | Reaches narrow spouts, corners, and the base of taller cups | Yes |
| Plastic or silicone scraper | Lifts dried food without scratching glass, plastic, or silicone | Yes |
| Clean dish towel or drying rack | Allows gentle drying without rubbing directly over the markings | No |
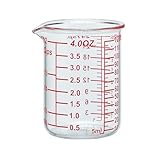
| Ackers BORO3.3 4 oz/120 ml Glass Measuring Cup with V-Shaped Spout | A compact glass option; its 4-ounce/120-milliliter size is convenient for dressings, extracts, and small batches | Product example |
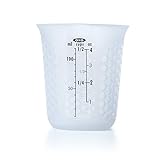
| OXO Good Grips Mini Squeeze & Pour Silicone Measuring Cup | A flexible option for pouring small amounts, particularly where a soft body and controlled spout are useful | Product example |
Small measuring cups in these categories commonly cost about $6–$9, depending on the material, size, and retailer. Before using a dishwasher, check the care instructions supplied with your specific cup. The location and durability of printed markings vary by product.
Step-by-Step
1. Rinse the cup soon after use (30–60 seconds)
Pour out any remaining liquid, then rinse the inside and outside with lukewarm water. Rinsing immediately is especially important after using honey, corn syrup, oil, food coloring, or acidic ingredients. These substances can dry into a film that requires more scrubbing later.
Hold a glass cup securely by its sides rather than gripping the rim. For a flexible silicone cup, open the body fully so water can reach creases and the bottom. Do not run very hot water over a cold glass cup; a sudden temperature change can cause thermal shock.
2. Read the markings before applying soap (15 seconds)
Take a quick look at the measurement lines and numbers. If a mark already appears faint, avoid rubbing directly across it. This check also helps you distinguish a removable food film from genuine fading. Greasy residue often makes markings look dull but will disappear after a gentle wash.
Do not use the measurement lines as a scrubbing guide. Repeatedly rubbing one narrow band can wear it faster than cleaning the rest of the cup.
3. Make a mild soapy solution (30 seconds)
Add about 1 teaspoon of mild liquid dish soap to 1 quart of lukewarm water, or place a small drop of soap on a wet sponge. A diluted solution is generally sufficient for ordinary kitchen residue. More soap does not necessarily clean better; it mainly creates more residue to rinse away.
Skip scouring powder, abrasive cream cleansers, bleach mixtures, and strong degreasers unless the manufacturer specifically approves them. Never combine bleach with vinegar, ammonia, or other cleaners.
4. Wash around the markings with a soft sponge (1–2 minutes)
Wipe the cup using light pressure and broad strokes. Clean the inside first, then the outside, handle, base, and rim. Keep the sponge moving rather than pressing hard on a printed line. A microfiber cloth can work well on smooth glass, while a soft cellulose sponge is useful for silicone and textured grips.
For a cup with a V-shaped spout, wipe along both sides of the spout and underneath its lip. Food residue frequently collects there. Use a soft brush only when a cloth cannot reach the area. Choose bristles that bend easily; stiff nylon or metal brushes can scratch surfaces and markings.
5. Loosen dried residue instead of scraping aggressively (2–5 minutes)
If food has hardened, fill the cup with lukewarm soapy water and let it soak for 2–5 minutes. For a glass cup, you can place a soft cloth over the rim to keep the water in while it soaks. Then lift the residue with a plastic scraper or your fingernail through a cloth.
Do not use a knife, fork, razor blade, steel wool, melamine foam, or the rough side of a heavy-duty scrub pad. These tools may create fine scratches and can remove or roughen printed measurement lines. Silicone cups should not be sharply folded around a dried deposit, since creases can trap residue.
6. Rinse thoroughly with lukewarm water (30–60 seconds)
Rinse until the water sheets cleanly from the surface and no slippery soap remains. Pay special attention to the spout, handle junction, base ring, and any molded folds. Leftover detergent can create a haze that makes markings harder to read and may affect the taste of the next ingredient.
If the cup has a narrow opening, fill it halfway, swirl, and pour through the spout. Repeat once if you can still feel a soapy film.
7. Dry without rubbing over the markings (1–3 minutes)
Place the cup upside down on a clean drying rack, provided air can circulate around the rim. For a silicone cup, leave it open and upright if its shape tends to trap water in folds. You can pat the outside dry with a clean towel, but avoid vigorous rubbing across printed numbers.
Do not stack a damp cup against another item. Trapped moisture can leave mineral spots on glass and keep residue inside seams or textured surfaces.
8. Inspect the markings after drying (30 seconds)
Hold the cup under normal kitchen lighting and check the lines from several angles. If a mark looks cloudy, wipe the area once with a clean, damp microfiber cloth. If it remains faint after the cup is clean and dry, the marking may be worn rather than dirty.
Mistakes to Avoid
- Using the dishwasher automatically: High heat, concentrated detergent, water pressure, and contact with other dishes can accelerate fading or scratching. Use the dishwasher only when the product instructions specifically allow it, and place the cup so it cannot rub against metal utensils.
- Pouring boiling water into cold glass: Let the cup warm gradually with lukewarm water. Avoid abrupt temperature changes even when the glass is labeled heat-resistant.
- Scrubbing directly across printed lines: Clean gently around the markings instead of treating them like a stubborn stain.
- Using abrasive sponges or powders: “Extra scrubbing power” can permanently dull glass and remove surface printing.
- Soaking indefinitely: A short soak loosens food, but extended soaking can affect some printed finishes, adhesives, handles, or flexible components.
- Leaving oil behind: A quick rinse may not remove grease. Use mild soap and rinse completely rather than repeatedly rubbing the markings dry.
- Storing cups while damp: Moisture encourages odors and can make residue collect around the base or spout.
How Often
Wash the cup after every use. Rinse it immediately after thick, sugary, oily, acidic, or strongly colored ingredients. Give it a more deliberate inspection once a week if you use it daily, looking for cloudy buildup, sticky seams, or fading numbers.
Once a month, clean the handle junction, underside, spout, and base carefully with a soft brush or cloth. Do not use a monthly deep clean as a reason to use harsher chemicals. Gentle, consistent cleaning is safer for markings than occasional aggressive scrubbing.
When to Call a Pro or Replace
Most household measuring cups do not need professional repair. Replace the cup if a crack, chip, sharp edge, warped rim, loose handle, or split silicone body affects safe handling or accurate pouring. Replace glass immediately if it has a hairline crack, even when it still appears usable.
Consider replacement when essential markings are permanently unreadable. A cup with intact volume lines can remain useful despite cosmetic fading, but a missing 1-cup, ½-cup, or milliliter mark undermines accurate recipes. Persistent odor, sticky residue that will not wash away, deep scratches, or a cloudy surface that interferes with reading are also good reasons to buy a new one.
Contact the manufacturer instead of attempting a repair if a handle separates, a printed scale begins peeling, or a silicone seam opens during normal use. Do not repaint or apply adhesive over measurement lines; added material can change the surface and make the scale inaccurate.
FAQ
Can I wash a liquid measuring cup with hot water?
Use lukewarm water for routine cleaning. Hot water may be suitable for some silicone or heat-rated glass cups, but avoid pouring it into a cold glass cup because rapid temperature changes can cause cracking. Always follow the care instructions for the specific product.
How do I remove greasy film without scrubbing off the markings?
Use a small amount of mild dish soap in lukewarm water and let the cup soak for 2–5 minutes. Wipe with a soft sponge, rinse thoroughly, and repeat once if necessary. Avoid powders, steel wool, melamine foam, and strong solvents.
Are silicone measuring cups safer for markings than glass ones?
Neither material is automatically safer. Silicone is flexible and less likely to break, but its folds can hold residue. Glass is rigid and easy to inspect, but it can chip or suffer thermal shock. In both cases, mild soap, soft tools, and careful drying help preserve markings.
What should I do if the markings are already fading?
Stop using abrasive cleaners and compare the cup with its original measurement scale, if available. If the lines remain readable, reserve the cup for tasks where approximate measurements are acceptable. If key markings are missing or confusing, replace it rather than guessing.
Ready to decide? Our #1 pick for 2026 is the Lukewarm water, about 90–110°F.
Live price & availability on Amazon.




Write Your Review
No reviews yet. Be the first to share your experience!