
Quick answer: Our top pick in 2026 is the Compact catchall — our #1 rated choice. See the full ranked comparison, alternatives and buying advice below.
- Best Kitchen Counter Organizer Trays for a Neater Countertop
- Quick comparison: which tray size and material fits your counter?
- The best choice by countertop situation
- Material comparison: what holds up in daily use?
- Why raised edges matter more than decorative handles
- How to calculate the right tray size
- Durability and ownership details shoppers often miss
- How to set up and maintain a counter organizer tray
- Bottom line
- Related Guides
Best Kitchen Counter Organizer Trays for a Neater Countertop
The best kitchen counter organizer tray is usually a washable tray with a raised rim, a footprint that leaves working space around it, and enough capacity for the items you use every day without becoming a dumping ground.
For most kitchens, a tray measuring roughly 12 by 8 inches (30 by 20 cm) is the most versatile choice. Choose a smaller 9-by-6-inch tray for a narrow counter or coffee station, a larger 16-by-12-inch tray for oils and cooking tools, and a high-sided tray when spills or bottles sliding off the counter are your main concern.
Quick comparison: which tray size and material fits your counter?
| Tray type | Typical dimensions | Common materials | Raised edge | Best for | Typical price range |
|---|---|---|---|---|---|
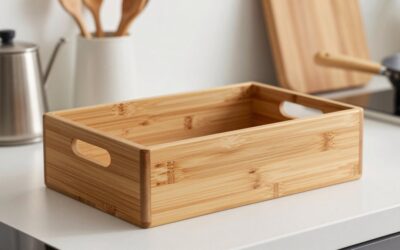
| Compact catchall | 9 x 6 x 1 inches | Plastic, bamboo, metal | 0.5–0.75 inch | Keys, packets, tea supplies, small appliances | $8–$20 |
| Everyday counter tray | 12 x 8 x 1.25 inches | Powder-coated steel, bamboo, plastic | 0.75–1 inch | Oil bottle, salt, pepper, utensil crock | $15–$35 |
| Large cooking tray | 16 x 12 x 1.5 inches | Metal, wood, solid plastic | 1–1.5 inches | Several bottles, cutting accessories, baking supplies | $25–$60 |
| High-sided utility tray | 14 x 10 x 2 inches | Plastic, silicone, coated metal | 1.5–2 inches | Leaky bottles, cleaning products, messy prep areas | $18–$45 |
Dimensions in product listings generally describe the outside of the tray, not the usable interior. A tray with thick walls or rounded corners can have 1–2 inches less practical storage width than its headline measurements suggest.
The best choice by countertop situation
| Your situation | Recommended specification | Why it works |
|---|---|---|
| Less than 10 inches of available depth | 9 x 6 or 10 x 7 inches | Organizes essentials without blocking the backsplash or workspace |
| Daily coffee or tea station | 12 x 8 inches, 0.75-inch rim | Holds canisters and tools while containing loose grounds and drips |
| Cooking oils beside the stove | 14 x 10 inches, 1-inch rim, heat-resistant material | Provides bottle stability and catches small oil spills |
| Heavy bottles or cast-iron accessories | Metal or thick plastic with non-slip feet | Resists flexing and is less likely to slide when loaded |
| Rental or easily marked countertop | Smooth plastic or coated metal with rubber feet | Reduces the chance of scratches and is easy to replace |
| Decorative display with light items | Bamboo or wood, 12 x 8 inches | Adds warmth and looks better than utility-grade plastic |
Material comparison: what holds up in daily use?
Powder-coated metal
Metal trays are a strong choice for bottles, jars, and frequently handled items. They are rigid, so the base is less likely to bow when carrying a full load. Powder coating also gives the surface a more furniture-like appearance than unfinished steel.
The weak point is the coating. A deep scratch or chipped edge can expose the metal beneath it, especially around handles and corners. Wipe spills promptly and avoid abrasive scouring pads. Metal may also transmit noise when glass jars are placed down, so a thin silicone liner can make the tray quieter and protect both surfaces.
Bamboo and finished wood
Bamboo and wood suit visible countertop storage, particularly for bread, coffee, fruit, or a small group of matching containers. They are usually light enough to move but rigid enough for normal household loads.
Wood requires more care than plastic. Standing water can swell joints, lift the finish, or create a rough edge over time. Do not leave it soaking in a sink or put it in a dishwasher unless the manufacturer specifically permits it. A damp cloth followed by immediate drying is the safer routine.
Plastic
Plastic offers the easiest cleaning and usually the lowest price. It is useful near a sink, under soap bottles, or in a busy family kitchen where spills are routine. Look for a thick, slightly flexible base rather than very thin plastic that bends when lifted.
Some plastics become brittle after prolonged exposure to sunlight or heat. Do not place a plastic organizer directly against a hot pan, toaster oven vent, or stovetop burner. Smooth plastic is also easier to sanitize than textured plastic, which can trap grease in its pattern.
Silicone-lined or silicone trays
Silicone provides excellent grip and muffles the sound of jars. It is helpful on polished stone or laminate counters where sliding is annoying. However, silicone can attract dust and may retain oily smells if it is not washed thoroughly. A removable silicone insert is often more practical than a completely soft tray because it combines a rigid structure with a washable, non-slip surface.
Why raised edges matter more than decorative handles
A raised edge has three practical jobs: it keeps bottles inside the footprint, contains small spills, and gives you something to grip when moving the tray. For ordinary countertop storage, a rim between 0.75 and 1 inch is a useful compromise. It is high enough to stop a jar from rolling away but low enough to reach over comfortably.
Choose a 1.5- to 2-inch edge for cleaning products, leaky oil bottles, or items that need extra containment. The trade-off is access: tall sides can make it harder to remove small objects from the middle. If the tray will hold a tall bottle, check that the rim does not cover its label or interfere with the pump.
Open handles are convenient when you move the entire collection frequently, but they add width to the footprint. Cutout handles can also collect crumbs. Integrated side grips are preferable when the tray will be lifted while full.
How to calculate the right tray size
Measure the available counter area in three directions: width, depth, and height beneath cabinets or shelves. Then leave at least 1 inch of clearance on the sides where you need to grip the tray. If it will sit beside a wall, backsplash, or appliance, leave about 0.5 inch so crumbs and moisture do not become trapped.
For example, suppose the open counter area is 15 inches wide and 11 inches deep. Subtract 1 inch of clearance from each dimension:
- Usable width: 15 − 2 = 13 inches
- Usable depth: 11 − 2 = 9 inches
- Practical tray size: no larger than about 13 by 9 inches
A 12-by-8-inch tray would fit comfortably, while a 14-by-10-inch tray would leave little room for lifting or wiping around it. If you plan to store bottles, measure the largest bottle diameter and add at least 0.5 inch of side-to-side clearance. Four bottles that are each 3 inches wide need approximately 12 inches of linear space before allowing for gaps or a curved tray interior.
Durability and ownership details shoppers often miss
- Check the base for flex. A tray that bends under a 10-pound load can spill bottles even if its listed dimensions are ideal.
- Inspect the underside. Rubber or silicone feet protect counters and reduce sliding, but hard plastic feet can scratch some finishes when grit gets underneath.
- Look at corner construction. Glued or stapled decorative corners may loosen sooner than a molded plastic tray or welded metal tray.
- Consider liquid containment. A rim does not make a tray leakproof. Look for a continuous raised lip rather than four separate corner bumps.
- Plan for cleaning access. A tray that is too heavy or awkward to lift will encourage crumbs and sticky residue to remain underneath it.
The most common mistake is choosing a tray based on the number of objects it can technically hold rather than how easily those objects can be reached. Keep the daily essentials in one layer where possible. If items are stacked two or three deep, the tray may look tidy while making routine use slower.
How to set up and maintain a counter organizer tray
- Measure before buying. Account for handles, appliance cords, cabinet overhangs, and the space needed to lift the tray.
- Group items by one task. Build a coffee, cooking-oil, baking, or cleaning station rather than combining unrelated objects.
- Put heavy items toward the center. This lowers the chance of tipping and reduces stress on handles and corners.
- Add a removable liner when needed. A thin washable mat protects wood and reduces noise in metal trays without permanently changing the tray.
- Clean underneath weekly. Lift the tray, wipe the counter, and dry both surfaces before replacing it.
- Remove unused items monthly. If an item has not been used recently, return it to cabinet storage so the tray remains a working station instead of a collection bin.
For general cleaning, use warm water and mild dish soap unless the material instructions say otherwise. Dry wood immediately, avoid abrasive cleaners on coated metal, and check that silicone liners are fully dry before placing them back in the tray.
Bottom line
Choose a 12-by-8-inch tray with a 0.75- to 1-inch raised edge if you want one adaptable organizer for everyday essentials. Select plastic for easy cleaning and lower cost, powder-coated metal for rigid support and heavier loads, bamboo or wood for visible decorative storage, and a silicone-lined design when sliding and noise are problems. The best fit is not the largest tray available: it is the smallest one that holds your daily items with room to lift, wipe, and reach everything without rearranging the countertop.
Ready to decide? Our #1 pick for 2026 is the Compact catchall.
Live price & availability on Amazon.




Write Your Review
No reviews yet. Be the first to share your experience!